The Scrap House
Thanks to Michelle Manetti and the Huffington Post!
2 Comments
Hi Everyone,
Just wanted to write a quick note thanking Michelle Manetti for her article on the scrap house surviving Hurricane Sandy. Sadly, I still don’t have any substantive updates – I will eventually, I promise! However, if anyone finds this blog and has any questions, or just wants to chat about tiny homes or scrap building techniques, I’d be more than happy to do so. Just leave a comment, or I can be reached at tefort@gmail.com. Thanks again everyone, Michelle, and Kent Griswold for his excellent work at The Tiny House Blog. If you need inspiration for tiny homes, that’s a great place to start.
Have a great day,
Ted
Happy New Year!, In April…
2 Comments
Sad but true, this is the first post this year. Amazing what living 400 miles from a project does to progress. It’s like building a ship in a bottle, except that it’s not like that in almost any way. However, during Spring break, progress was made. I had about three days at my disposal so the living room of the house got some attention.
I don’t have in-progress photos because I’m a terrible person. I just have the end results of the day. However, I finished the tar-paper underlayment of the walls, then finished putting up the kite material, and then trimmed. The trim has a couple rough edges because, well, I’m not great at doing trim.I need to tighten the walls in a couple places, but overall I’m rather pleased with the results.
Standing in the kitchen looking towards the door:

Generic Artistic Angle Shot, To Left of Door:

Now, to the right of the door you’ll notice the trim under the window. I didn’t have enough of any one type of trim to frame that space completely, and besides, I needed a rather wide piece for the gaps. So, the bottom half is done with a different, thicker, trim. It, uhh… adds character.

A little strange, but nothing terrible looking in my opinion.


The area next to the kitchen got done too. It’s not as taught as I’d like, but I can work on it later. There weren’t as many studs to tie into as I’d have liked, and I should probably have added some furring strips.
The fabric wrapping around the corner was one piece, so it kind of looks like a giant half-tuna half-airplane was crashing.

The circuit panel is going to remain exposed like that. It’s a very nice laminated one from a yacht, so it’s kind of pretty in its own right. In addition, it is close enough to the loft that you could lean over the edge and flip the breakers to turn off the lights if you wanted to before going to bed.

Lastly I need to mention a gift the house received. Our awesome neighbor April gave me this photo she took to hang up in the house. It fits the color scheme shockingly well. I’m guessing it will end up in the kitchen, as I haven’t yet figured out how to hang something without damaging the soft walls. Either way, Thanks April!

Next time will likely be the summer, sadly. It’s getting incredibly close though. A couple more pieces of trim and the living room is completely done. The bathroom just needs trim and paint. In the kitchen the countertops are done, as are the cabinets and floor. I need to finished making the sink, plumb the whole thing, and then install paneling. All in good time.
I’m still not sure what the ceiling is going to be. I’m holding off doing any ceiling treatment, as we don’t know the final plans for the house yet. It’s very possible that it will be moved again, and if it is, it’s very possible that the roof will be cut off in the process. Because of this, I’m trying to keep it as modular as possible. If/when I rebuild the roof, I’ll likely add some wide dormer windows in the loft. I regret not having thought of that design when building it, as it’s essentially free space. Besides, I have the perfect crank-out window for it already! This is what I’m talking about:

Photo credit and a gorgeous design goes to http://www.goldthreadtinyhouse.blogspot.com/
Alright, that’s it for now. Peace everyone!
It’s news when I say it is!
8 Comments
Well, unfortunately, all of the progress exhibited in this post happened about a month ago. Apparently college takes time and after writing a paper interpreting the eleventh chapter of Genesis, one’s enthusiasm for composing a blog post is diminished. Nonetheless, the photos have been floating on my phone and so I might as well post them at this belated date.
When we left off, I’d finished the kitchen counters and cabinets and had begun work on the wall covering. And so there we shall commence. I had found some paneling, presumably out of a mobile home, in the dump that was surprisingly intact several months ago. We used the nicer Wainscoting in the living room, and so I decided to use the thinner paneling in the bathroom.


The darkness of the paneling and the smallness of the space provided a shockingly good example of what a vertical coffin would likely feel like. After some priming I applied a couple coats of yellow I had and it looks a lot better.

I know that top corner is rough, but there’s actually a specific reason for it. Getting the paneling in the house was such a tight squeeze that that corner would have prevented it from fitting in at all. Getting a 7’X4′ piece of anything into the front door, into the kitchen, and then making the turn into the small bathroom door…. well, let’s say that corner was clipped out of necessity. I’ll either put some molding on it, which it would probably need for the top edge anyway, or make a high shelf for towels. It’ll get covered up and looking all fancy eventually.
Bare plywood flooring doesn’t have the best reputation for being comfortable on one’s feet, so something had to be done about that. I don’t have any photos of the process, because tiling is time sensitive, so I thought it more important to do it right than to document it. I think y’all know the drill though

We had the tile left over from our living room renovation we did several years back. Never know when something is going to prove useful again.
Post grout:

Hard to see there but it looks quite nice against the spiral wood kitchen floor…

Astute readers will notice I didn’t leave a hole for the toilet. This was done purposefully for a couple reasons. The first reason is I didn’t actually have a toilet, and until I find a specific one I don’t have the proper measurements to know where the hole needed to be. The second reason is we’re not sure where this house is destined to end up or how it’s destined to be used. It might work out better for it to use a chemical toilet; we just don’t know. Either way, it’s easier to cut out tile than to add it so I simply made the floor solid and will deal with it later.
The other bit of progress I got was some continued work on the living room walls. Because of the slightly transparent nature of the kite board material, I put tar paper up first and then covered that with the kite. Unfortunately, I ran out of tar paper. I have more now, and I have plenty of the kite material to finish, but time was not something I had that day so the finish of that step will come at a later date.

The light area is kind of a metallic silver… it’s pretty slick looking.
I had to frame out the fixtures to have something to pull the fabric taught to. Just some scrap lumber nailed in place.

Then just staple all around, screw on a plate, and it looks quite nice I think. You can see a couple staples through the fabric from the tar paper, but I don’t think it’s detrimental.

The final picture is not so much documenting specific progress, but rather a photo I took from the loft which nicely demonstrates the feel of the space.

I’ve since moved into another type of tiny house- the college dorm room. They seemingly don’t take too kindly to construction projects. Not that that has stopped me. I did build a nice arch for our TV between our beds. The second bed I built a platform onto that make a sort of reverse-loft.

I actually, gasp, bought the lumber for this. Which made me realize something- I spent roughly $12 on that project, which means that arch cost more than the entire scrap house. Wow. Perspective, it’s an amazing thing. Totally worth it though; would you believe no one else has a floating TV arch in their dorm room?!

I’m not sure when the next wave of progress is going to happen; hopefully over Thanksgiving break. I’ll post whenever it happens! Thanks everyone.
And for the ending quote, I’ll use one I found yesterday and quite liked:
“The cure for boredom is curiosity. There is no cure for curiosity.” -Dorothy Parker
A rather unfortunate misunderstanding.
3 Comments
Last night, Ed made the following post. Whether his name is actually Ed or if he was simply making an Editor joke, we will likely never know.
“Sorry, don’t know if “Waynes Coating” is a little joke or just your interpretation of having heard the word spoken but not seen it written”
However, I believe he was in fact referring to Wainscoting. Which is a completely separate matter. I should have made myself more clear to have avoided such a grave miscommunication.
You see, I actually had the intention of making wall panelings out of the rather fetching leather garment, as seen below.

I should have been more clear, and I apologize for my negligence.
Also; Wayne Brady makes Elmo look like Malcom X.
It looks like… a house!
5 Comments
Fairly major update today. I’ve been working on the kitchen, and my dad has been working on the living room. Let’s start with my less heroic efforts.
A few days ago I started framing in the cabinets. Random 2×4 scraps… it’s a common theme!

Now, I’d like to talk a little about Ockham’s Razor. He’s a man with a damn close shave, y’all. But he had some jazz about the simplest solution being the best. Well, I should have run with that. But no… oh no. I had some old bi-fold doors that I’d planned to use as the cabinets. According to the archives, I found them at the dump on May 5th of 2009. Retro! Here’s the first attempt at the hinges:

Simple physics will tell you, and should have told me, that that just won’t work. Gotta have clearance on the front end, yo! So, real cabinet hinges are compound. Compound is a fancy word for complicated. So I went with it! Take two:


And that… didn’t work brilliantly. It was like Bob Dylan… the range was limited.

So then I did the unthinkable. I looked at a real cabinet. I was frontin’ like Andrew Jackson! *insert cricket noise* Anyway… turns out that the hinges go on the outside! Brilliant! Fulcrums and stuff!
So I cut these hinges(notice the cut line), and then mounted them on the outside. And as the French say, “it worked.” (Some French people speak English.)


A little trimming to the edge for clearance and voila.

I then did the other cabinet door, for under the stove. That involved cutting another bi-fold door, ripping the edges off, and then reusing those pieces as trim for the front. I.e. the top and bottom became the edges of the front. If you cut a bi-fold door up enough it eventually just gives up and becomes a cabinet door.


Now, despite having found two nice stainless steel double-basin sinks, I’d yet to find one small enough. However, I did find a bucket that had been used as a grout bucket. It looks enough like a sink, and was the perfect size. However, it needed to have a sloped bottom to drain properly, so I drilled a hole in the center, bolted it to a 2×4, and pulled on it until it was sufficiently dented. I’ll install a drain later.


I then proceeded to plywood the top and cut the hole for the sink.


Then came more plywood for the backsplash.

And then the tile. The tile itself was left over from doing our fireplace several years ago. The spacers and grout were from a generous donation about a year ago from Pennsylvania. So thanks to Leo Carmosky for that! He also gave me some tile that will likely see use in the bathroom.


Arbitrary Macro shot:

And then came grout and the front trim piece.


The dark spot on the counter in the next picture is just condensation from a drink, not a stain…

Meanwhile in the Hall Of Justice… Dad’s been working on the Waynes Coating for the living room. Something I have neither the skill nor the patience to do. Considering he’s had to dodge outlet hole’s cut by other people, it’s pretty damn incredible how good it looks.


The outlets were yet another hurdle. Back many moons ago when Hyatt and I did the wiring, we mounted the outlet boxes flush with the studs, which is incorrect. They are supposed to be slightly out, flush with the dry wall, or paneling as the case may be. So Dad had to redo those. But of course, it now looks great.

A coat of white and we’re golden. Or white, actually. It’s much more exciting than it looks… you’re watching primer dry. A darn site faster than paint!


Now, earlier tonight after doing the counters, I was in the mood for a proof of concept. So, armed with scissors and staple gun in hand, I took to covering one of the walls in the kite board material I got. This is, quite possibly, the greatest stuff on earth. Snapple ain’t got nothing on us! First off, because of the grid pattern, it cuts easily. I was simply tacking some up to see what it would look like, but within five minutes it was cut, tacked, and tight enough to be ready for trim. Simply awesome. I especially like the contrast between the white paneling and the vibrant green. There will be a chair rail, corner molding, and crown molding to frame it all in of course.

It is, in short, perfect. How my dad thought to go ask the local kite-board rental place for material is beyond me, but he did, and it’s awesome. The material is ever so slightly transparent, so on the other walls I’m going to put up tar-paper first to provide a solid backdrop. I have a ton of tar-paper anyway, so I might as well use it. Now… for the ultimate party trick… look how cool it looks with the bathroom light turned on!

And that, friends, is all I’ve got for the time being. No clue when the next update will be… we’ll see. Let’s see… a quote to leave on… I’m going to go the cheap route. I say the cheap route because it’s the same quote that’s been my email signature for a while, but I do like it despite it most likely being wrongly-attributed. So, nonetheless:
“I am a firm believer in the people. If given the truth, they can be depended upon to meet any national crisis. The great point is to bring them the real facts. And beer.” -Abraham Lincoln
Floor: Round Two
2 Comments
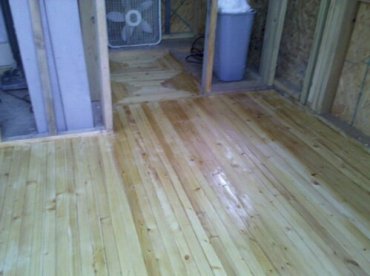
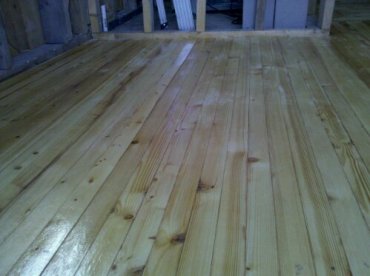


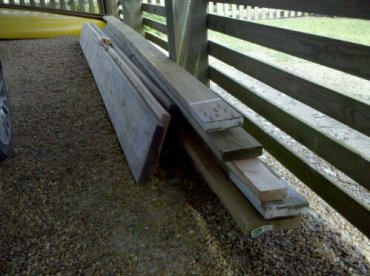
Here’s the photos of the floor after its second coat. It needs to be sanded again and it needs a couple more coats, but it’s looking good. I’ll also post a photo of yesterday’s wood find out of the car.
Yesterday’s Work, Today’s News.
2 Comments
Alright… Today’s post is partly out of date, partly current, and partly bilaterally breaking the space time continuum.
First we’ll visit a few days ago, and proceed until tomorrow.
A few days ago I checked the dump and intercepted some bead-and-batten panelling. You see folks, “intercepted” is an industry term for material that never hits the dumpster. It goes something like this:
*Scene opens, man with paneling in back of truck appears*
Me: “Hi, throwing that panelling away?”
Man in Truck: “Yup.”
Me: “Can I have it?”
Man in Truck: “Sure.”
Me: “Thanks.”
As you can see, it’s all very complicated and best left to the amateurs.
That trip yielded this:

Enlarged to show detail, like a cereal. Yes I’ve used that joke before. No, I don’t care.

Now, if there’s anyone more obsessed with preventing waste than me it’s my Dad. He once built a shelving unit that involved at least 50 8ft 2×4’s and arranged his cut list so, barring saw dust, there was less than 6″ left of scrap. What can I say, the guy’s good. Figuring out the layout of the paneling was his domain for sure.


This particular panelling will be used as waynes coating in the living room. Here’s the layout Dad worked out that dodged all the holes. When the Fibonacci sequence is used for waynes coating you know you’re doing something right.

Okay… now backtracking some more. To the order of a couple weeks. We wanted to still do some form of fabric paneling. My original plan was to use old drop-clothes, but Hyatt’s dad very poignantly asserted that there isn’t such thing as a scrap drop clothe. Touché. Well, thinking further we wondered about old kite board kites. I went up to a local kite board rental place, and as luck would have it they’d received 18 defective kites; all of which would have to be cut up and discarded. For some reason they could only give me one, but it’s more than enough. This will be the top half of the living room walls, above the bead-and-batten waynes coating. The green is a little loud, but I think the colour will be a nice punch next to the muted earthy wood. Also, I checked, and it’s nicely flame retardant to boot!

Okay… jumping back to the past couple days. I’ve continued sanding the floor… some of the floor over to the left of the living room was pretty uneven so I had to spend a couple hours with a belt sander, but I got it close enough to call.

At first we were worried that a belt sander might be too aggressive, so I made a little panel out of our scraps(relative term). Alas, it was fine, and thus the we went ahead. If in doubt, try it out!

We tried out a couple of stains, including the quintessential “Golden Oak.” In the end we thought the natural tone of the pine was the best, so we just used clear polyurethane. Apparently we have a rather unusual amount of random stain and polyurethane lying around our house, but for my purposes I certainly can’t complain. I’ve done a couple coats and so far it looks great; I couldn’t be more pleased. Unfortunately you can’t walk on it while it’s wet, and so I don’t have a photo of the poly’d floor yet. But I shall tomorrow. So, instead of something substantive here’s a random photo of clear Minwax polyurethane I found on Google Images!

Okay, and finally to today’s find. I was out running today and on my way back I was planning on taking the short route home. But then the voice appeared. It was clearly Morgan Freeman, so I took note. It told me to turn. And so I did.

See that little jut there? Had I not taken that, I’d not have run by the dumpster in front of the newly finished house and I wouldn’t have found this:

Let’s see… four or five 12′ 2×6’s, three 12′ 2×12’s, a 20′ 2×6, and a 16′ 2×4. A 12′ 2×12 currently sells for $31… it’s probably at least $120 worth of lumber in total. There are a couple nails scattered in it but past that it’s straight and clean. This will become the stairs and the deck. The moral? I presume it’s listen to Morgan Freeman!
I’ll post a photo of the polyurethaned floor tomorrow morning, and then there probably won’t be another post for a week or so. But I hope y’all have a great week.
Thanks, and… uhh.. peace and such.
And so it goes.
1 Comment
For being the quickest and only response to yesterday’s trivia. Congratulations!

I did… something.
2 Comments
Nothing quite like doing a considerable amount of work with little to no noticeable or appreciable result. Today, we first counter-sunk all the nails. Which is every bit as exciting as it sounds. It’s like numbering the shrimp at a Chinese buffet. It’s not fun, but it has to be done. Well, except you don’t really need to number shrimp.

Then the resulting holes were filled. I had this filler from some other project necessitating the filling of wood. But here’s the thing: the side that opens is not the top according to the label. That’s just annoying. The nerve of some major corporations!

And then we sanded. Apparently flooring made from ripped 2×4’s isn’t quite as even as what some people call “real” flooring. I will offer a bit of advice. If you ever make flooring this way, keep the cut pieces in order. I.e., lay them down in the same order you cut them. The floor is never going to be perfectly flat, so the best you can hope for is no sharp raised edges. Your saw gate is always going to slide slightly, so if you keep them in order you’ll be left with a more easily sanded wave-pattern, rather than more height differentiation between the pieces.


Here’s the finished kitchen. I also got about 16″ worth of the living room done… in total this took roughly 4-5 hours of sanding. Tomorrow will be great.

I also went to the dump and found some nice bead and batten paneling. However, it is still in the car, it’s 9:44 at night, and I don’t happen to be in my yard. And therefore you won’t get a photo of that until tomorrow. To make up for this grievous lack of thoroughness on my part, here’s another photo I took today. Extra points for the first person, who isn’t my dad or Hyatt, to correctly identify the vehicle. Note: this is similar to Whose Line; most of this is made up and the points certainly don’t matter.

More tomorrow. And to you all I say good day!
They spinnin’!
7 Comments
Just a small update today-
We finished the kitchen floor. I’m really pleased with how it looks. The kitchen floor is made entirely from the scraps from the living room floor, so it cuts down on waste. But the pattern Dad chose was really clever as well. Because it spirals inward, the pieces become increasingly smaller, and thus it lends itself to being made from scrap. While you might only have a few 18″ pieces to start, as you progress you’ll have more 12″, then from that 6″ and so forth. It worked swimmingly.


Terrible picture, mainly because it gets dark here at night(take that Alaska!) but you can see roughly what I’m referring to. Everything on the ground is what we had left from having done the living room and kitchen. Almost nothing; a few tiny pieces and some that were cracked. That’s it. Wonderfully efficient.

Alright… I most likely have a lead on some fabric for the walls and ceiling, but I won’t know until tomorrow evening so I’ll try and post an update on that. Until then, bask in the comedy of Steven Wright.
…..
Goodnight!
